Welcome to part two of my series on GPS logging and geotagging. In this entry, I’ll discuss preparing your NMEA logs for use with Lightroom to geotag your photos. This will lead up to the next blog entry where I will discuss what you can do now that your photos are geotagged. So, let’s get started!
What you’ll need:
- Adobe Lightroom (version 3 or later). This is the software I use to organize all my photos, and what I use to retouch and export photos for the web. It is the basis of this and the next entry of this series. If you do not have Lightroom, the next few entries will be of little use to you.
- Jeffrey Friedl’s Geoencode plugin for Lightroom. This powerful plugin will geotag our photos for us, as well as reverse geocode to add additional information into our photo metadata which will allow us to use another Lightroom plug in to stamp our photos with location information upon exporting them!
- GPSBabel – this software allows you to convert your NMEA logs from GpsGate to other formats to use in other software. In our case, the geoencode plugin for Lightroom is expecting a GPX file, so that is what we’ll give it.
OK, first thing is first. Fire up GPSBabel. You’ll be presented with a screen asking for an input file. You’ll be giving it one of your .nmea logs from your GpsGate GpsLog folder. So, to do this, from the dropdown select the input format “NMEA 0183 sentences” then browse for your NMEA log. You’ll see some stuff already in the Options textbox, just leave it on the defaults. In the Translation Options section, I usually just check Tracks. This is all you need to geotag your photos. If you select Waypoints, there will be a point for every GPS reading in your log. That works, too, but if you bring this file into Google Earth it will place a waypoint at every one of those locations, and it is rather crowded. For the output file format, you should select GPX XML from the dropdown, then browse to a folder where you want to store your converted files and give it a name.
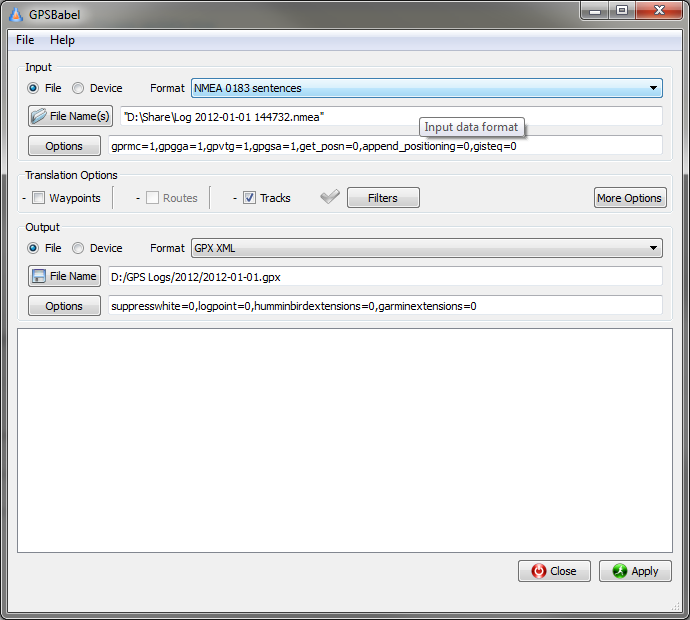
Now that all the settings are complete, click on Apply and GPSBabel will do it’s thing and create a GPX file for you. One of the cool features of this software is you can supply multiple input files and one output file, so if you want to combine a bunch of logs from a trip into one file, you can. Now that your GPX file is created, we can do the geoencoding process, so fire up Lightroom. If you haven’t imported the photos you want to tag, go ahead and do that now.
Select the folder with the photos you want to tag in the navigator panel of Lightroom and select the photos you want to tag, or click Edit->Select All to select all the photos in that folder. Then click File->Plug-in Extras->Geoencode… This will bring up the geoencoding dialog. What we want to do is Geoencode from Tracklog, so go ahead and click that tab. You should see at the top of the dialog how many images are selected, and the date range they cover. In my example, you’ll see they are for May 25, 2011 from 8:45pm to 9:44pm.
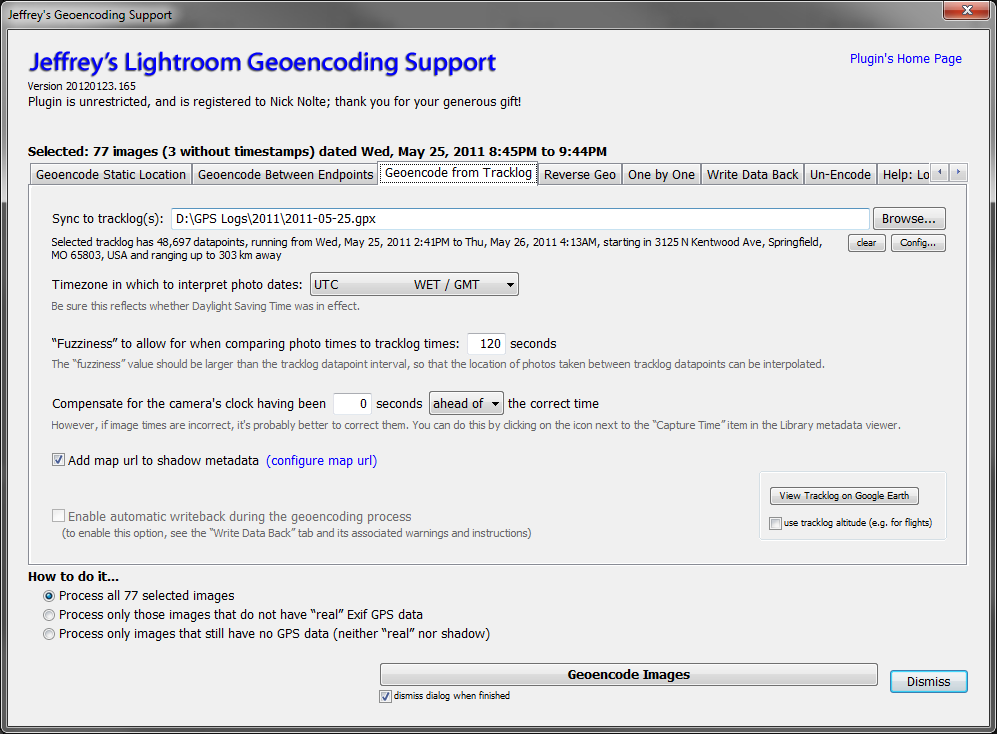
You’ll want to browse to your tracklog that you just converted with GPSBabel in the previous step. After you’ve selected your GPX log, if in the lower left corner of your geoencode dialog you see a red warning, like so:
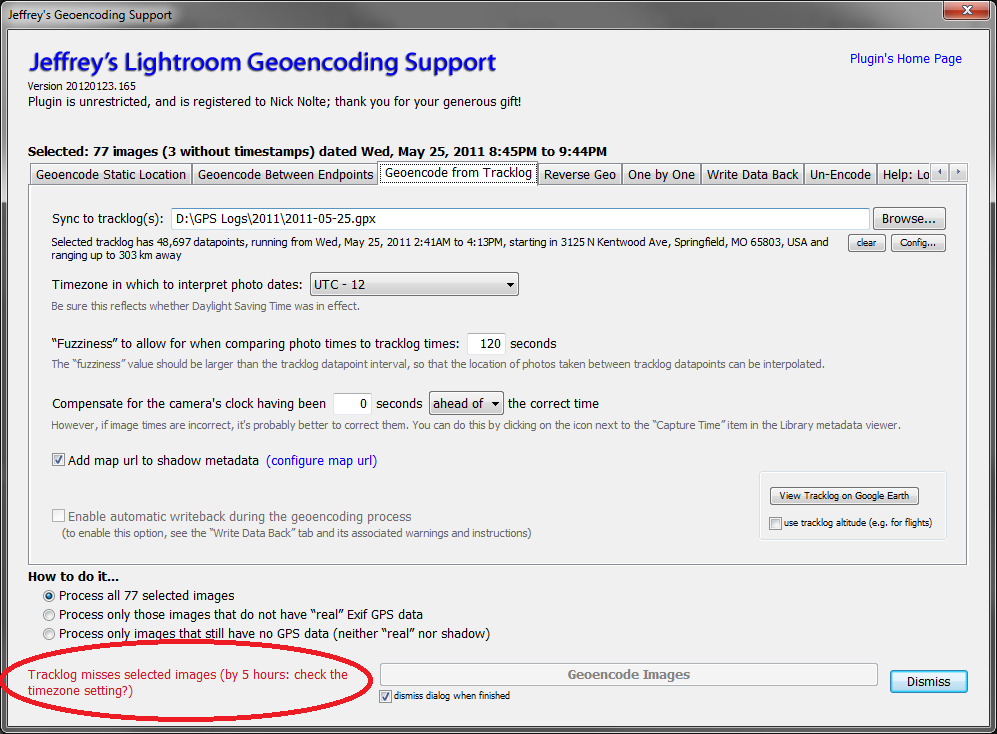
then you have a time mismatch between your GPX log and your photo time stamps. Usually the culprit is the Timezone setting. If you set your camera, as I suggested, to UTC, make sure you select UTC from the dropdown. If you do not it will adjust the time of your photos according to what is in that dropdown, and your photo locations will be mismatched. If it says something like “Tracklog misses images (not even close, misses by 5 weeks)”, well, you may have just selected the wrong log file. Once you’ve got it so there’s no warning in the dialog you can click the button to Geoencode Images. Once it finishes processing, your photos will now be geotagged. If you’re in Library view in Lightroom, you can expand the Metadata section on the right hand side, select a photo then select All plug-in metadata from the dropdown. You should see all the GPS data attached to your photo.

Should you happen to be moving while you took a photo, you should see something in the Speed and Bearing tags as well. So, there you go, you’ve geotagged your photos and if you click on the little arrow to the right of lat/lon in the Map tag, it will show you where you shot that photo on Google Maps.
Neato! Now we’ve added GPS data to our photos, we can get a little more fancy with Jeffrey’s plugin and actually reverse geoencode the latitude and longitude to get the nearest City where the photo was shot! To do this, select the images you wish to process then click on File->Plug-in Extras->Geoencode… one more time. Now we want to Reverse Geo, so click on that tab. This part of the plugin sends the lat/lon of your photo to Google’s reverse geolocating server and in return it sends back the nearest location information. Under the reverse-geocoding options I like to “Expand state to full names”, so NM becomes New Mexico, and I like to have it strip prefixes. This will make it say Detroit, Michigan instead of City of Detroit, Michigan. Once you’re happy with the settings, click the Bulk Reverse Geocode Selected Images button.
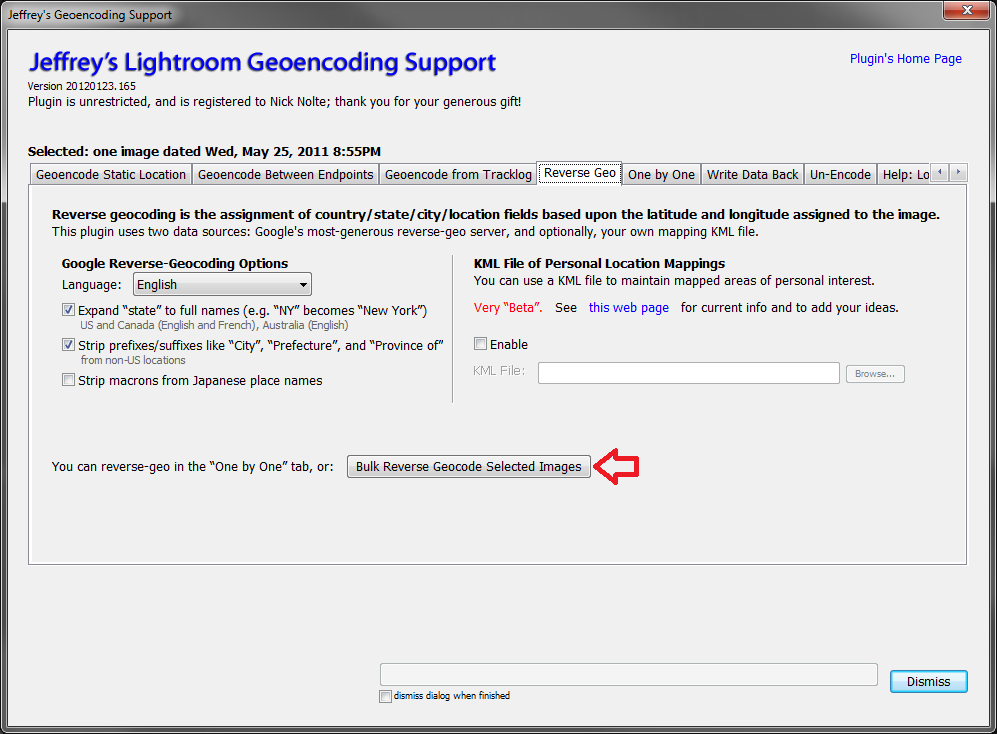
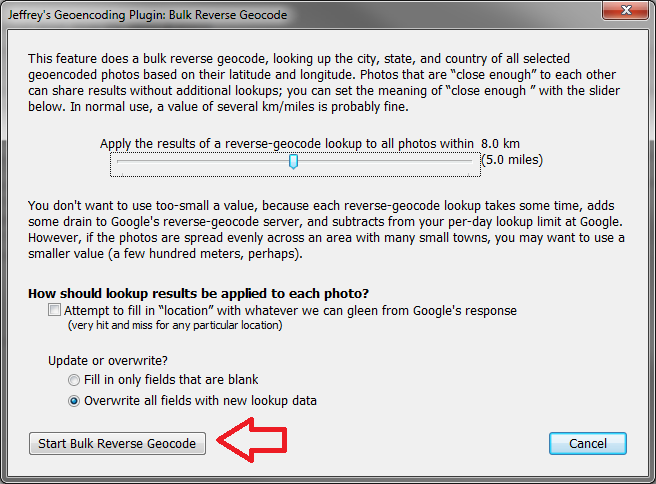
This will popup another dialog asking you to move a slider that basically says “all the photos within X miles of each other, use the same location information” So, if you’ve taken a bunch of photos in New York City, it only needs to ask Google’s server once where the lat/lon resolves to and it can apply the same City information to all the photos within a certain distance. I like to leave this on 5 miles. In Tornado Alley, you rarely have many cities within 5 miles of each other, and many times you may be somewhere where you are five miles from any city. I like to check the box that attempts to fill in the location best it can with Google’s response. Sometimes this will give you address information, too. That’s pretty cool. Start Bulk Reverse Geocode when you’re happy with the settings and it’ll start chugging away.
Once it has finished, you can check the Location metadata for the photo and you should see if has filled in the City, State and Country fields for you. If you checked the box allowing it to fill in all the information it could you may even get a Sublocation data, which would be an address or a region. You can see in this case, it told me what highway I was on when I shot this photo of the Ellsinore tornado on May 25, 2011.

So, that’s it for this blog. Now that you’ve got your photos geotagged and proper location information attached to them, the next entry of this series will show you how to export images with this data stamped right in the corner like so:
