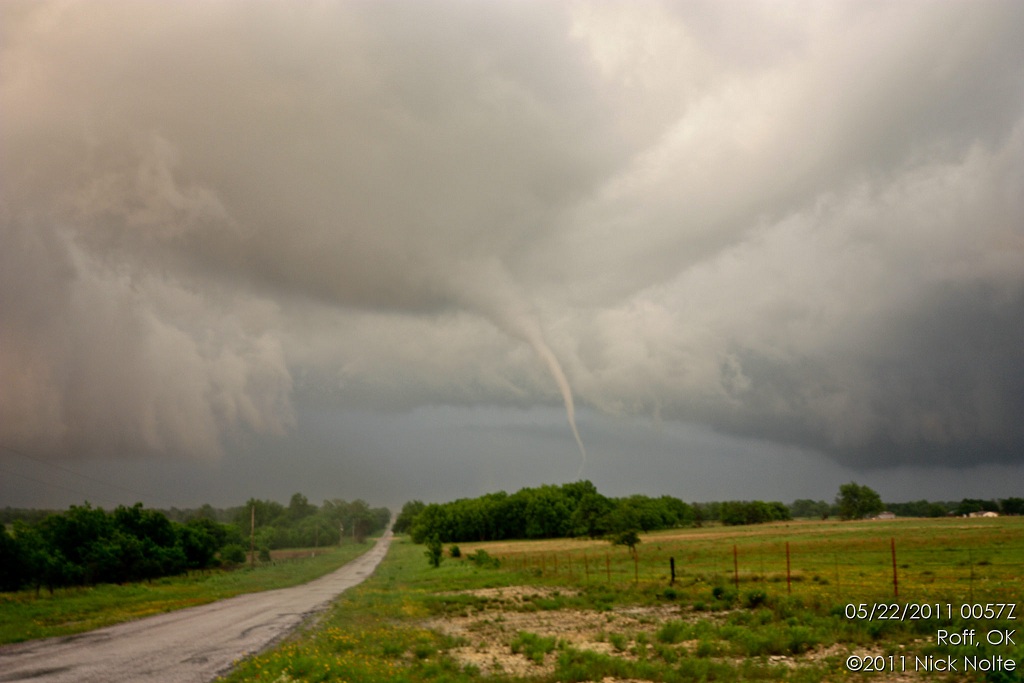
Welcome to part three in my series on GPS logging and photo geotagging. In the previous two entries, I explained how I use GpsGate to log my travels and how I use those logs to geotag my chase photographs. The end result is, not only a great collection of photos, but also a story that tells me where they’re from. In this entry, I’ll take it a step further and show you how to export images from Adobe Lightroom and stamp the time, date and location information right on the photo. You can even incorporate this with your copyright watermark, all in one swoop. Ah, the power of Lightroom with a couple of plugins 😉
What you’re going to need
- Adobe Lightroom – as before
- LR/Mogrify 2 – this is the plugin for Lightroom that does all the magic. We’re going to use it to add text annotations, but it can also do borders, graphical watermarks, resizing, background canvasses, compression, sharpening, color space altering and saturation and brightness processing. All of this can be configured and saved as a preset, allowing you to use it for exporting hundreds of photos with a single click.
- ImageMagick – If you’re on Windows, you’ll need this. If you’re on a Mac, it’s included with the LR/Mogrify 2 plugin.
Installing LR/Mogrify2
If you’re using Windows, you will need to download ImageMagick and install it. Be sure to pick the correct one for your operating system (32 vs. 64 bit). If you’re running on Mac, you do not need to download ImageMagick separately as it is included with the plugin. Once you’ve got ImageMagick installed, go ahead and download LR/Mogrify 2. The zip file contains a folder called LRMogrify2.lrplugin. You need to unzip that to some place you’ll remember. Or, you can unzip it right into the Lightroom Plugins folder, either works.
Once you’ve unzipped the plugin, fire up Lightroom and we’ll add it using the Plug-in Manager. To do that, click on File -> Plug-in Manager. This will bring up this window
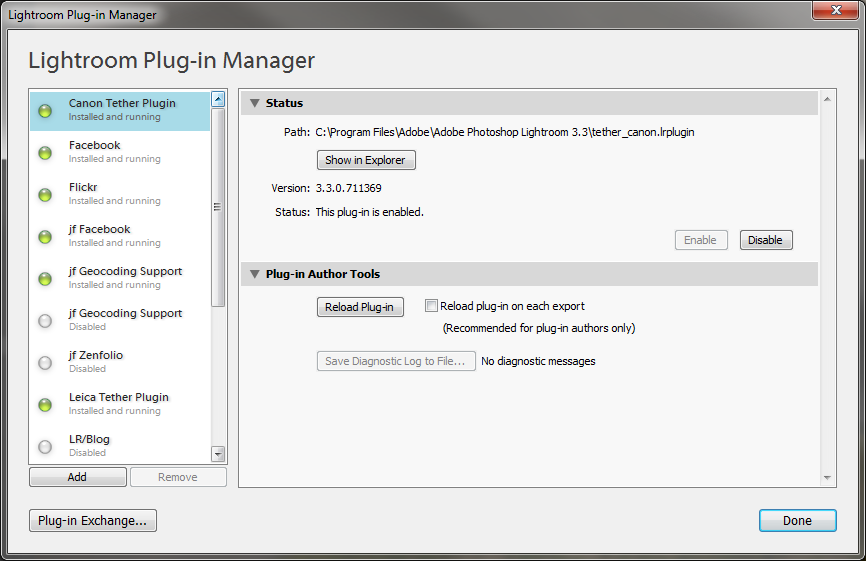
Click Add, then browse to where you unzipped the plugin and select the LRMogrify2.lrplugin folder and hit OK

This will add the plugin to your Lightroom and we’re ready to get started! Click Done to close out of the Plug-in manager.
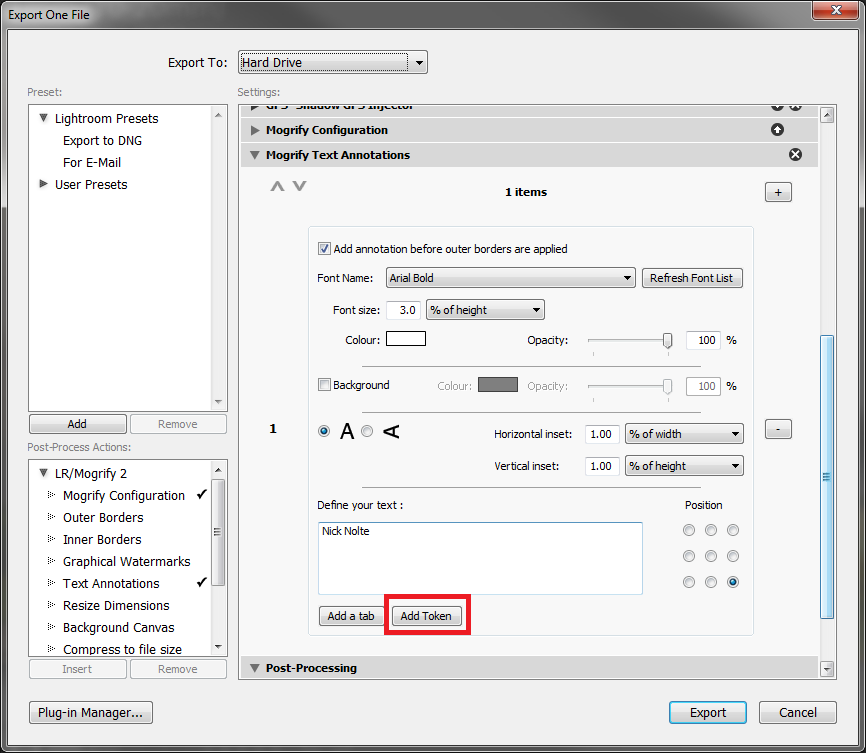
Now, head on over to an album that has some photos that you have geotagged using the steps from the previous two blog entries. We’ll keep it simple and just export one photo. The settings you specify in LR/Mogrify will persist from session to session, so once we’ve set it up once, we’re good to go. Right click on a geotagged photo and select Export->Export… You should see in the lower left a box containing a list of plugins which can post-process your exported photos. In here, you should see LR/Mogrify 2. Click on the little triangle to the left of it to expand it’s tree. You now see a list of actions it can do to any photos you export.
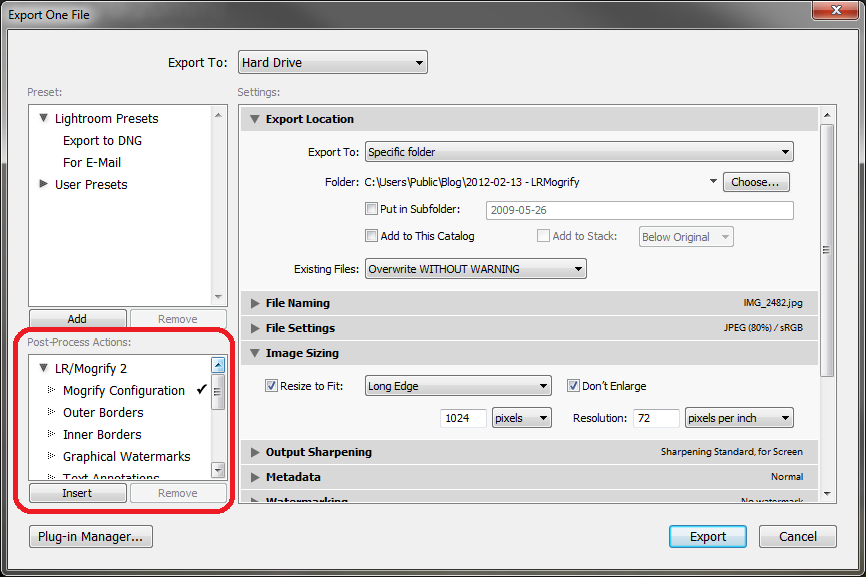
We are interested in adding Text Annotations so scroll down just a bit and double click on that. It should put a black checkmark next to it, that means it has been enabled.

Now that this is turned on, it will add the configuration to the right hand side of the Export dialog. Right now you probably just see Export Location, File Naming, File Settings, Image Sizing, etc. But, if you scroll down, you’ll see one titled Mogrify Text Annotations
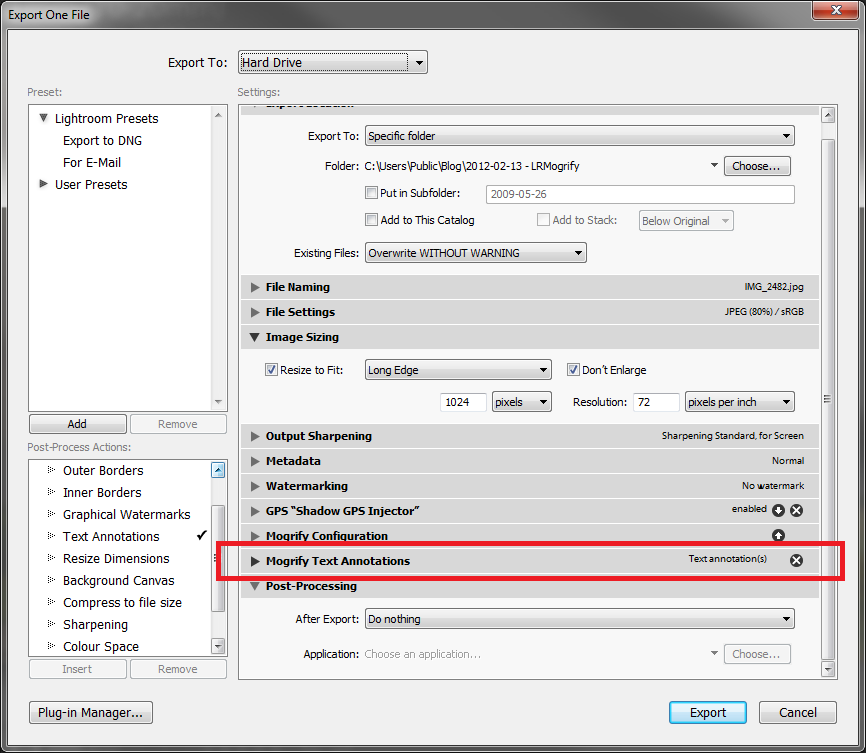
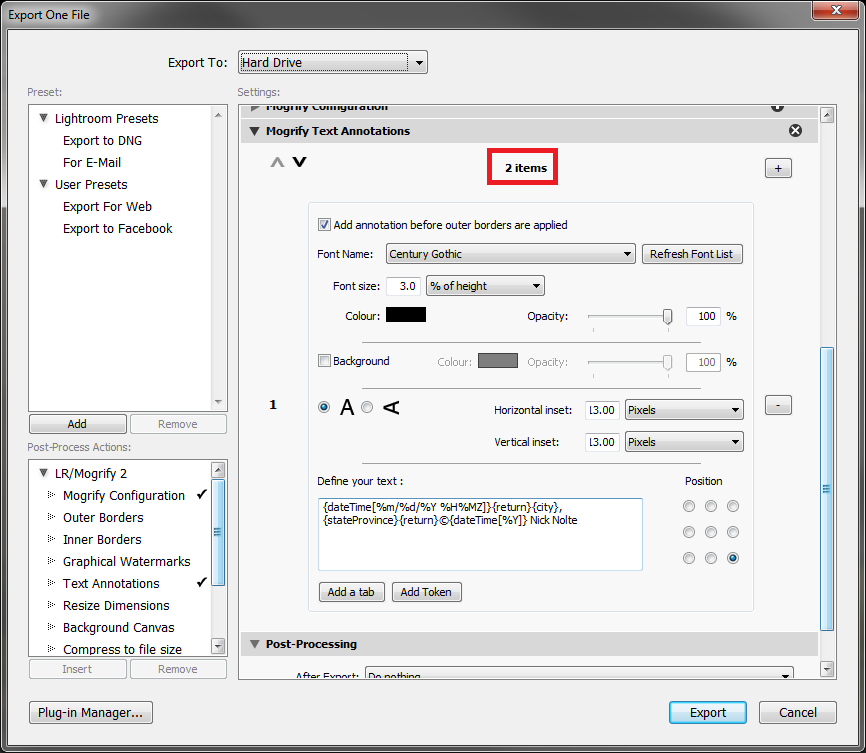
Go ahead and click on it to expand the window. Right now it should say 0 items. Click on the + to the right of that and behold the configuration options! It should now say 1 items and have a box full of settings for you to tinker with
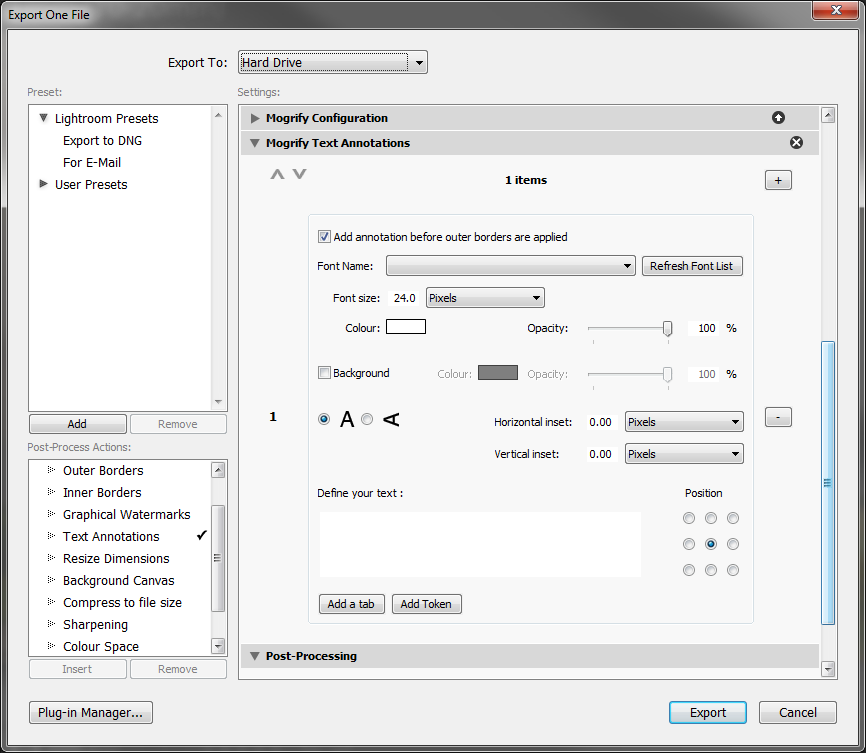
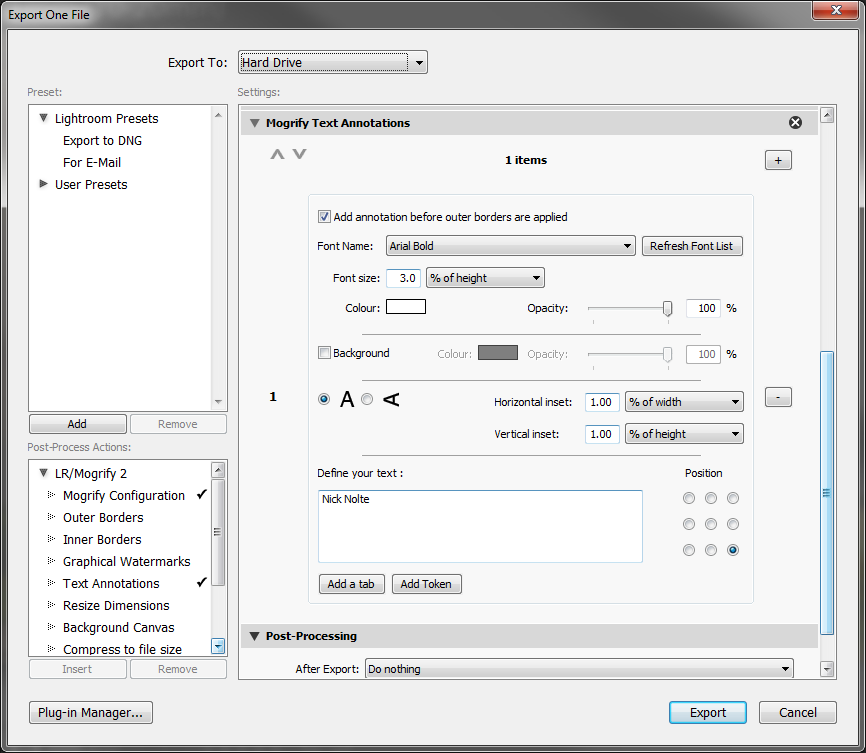
Let’s start off simple and just add a simple copyright watermark to our photo to get the feel of the plugin down. So, in the Font Name box, select a font that you like. In the font size, change that to 3% of height instead of 24 pixels. I find that leaving it set to 24 pixels makes the text far too small when you’re exporting at full resolution. This way, if you’re exporting an image that is 2000px high, it’ll make the text 3% of that, or 60pixels. White is fine for the color. The Horizontal and Vertical inset numbers basically act as a padding, moving your text from the edge of the photo. I like to set mine to 10 pixels, but feel free to mess around with that and find what works for you. In the Position box, you’ll see 9 radio buttons. This is basically where your text will be positioned on the photos. I like to set mine to the lower right. Now, in the “Define your text” box, go ahead and type in your name.
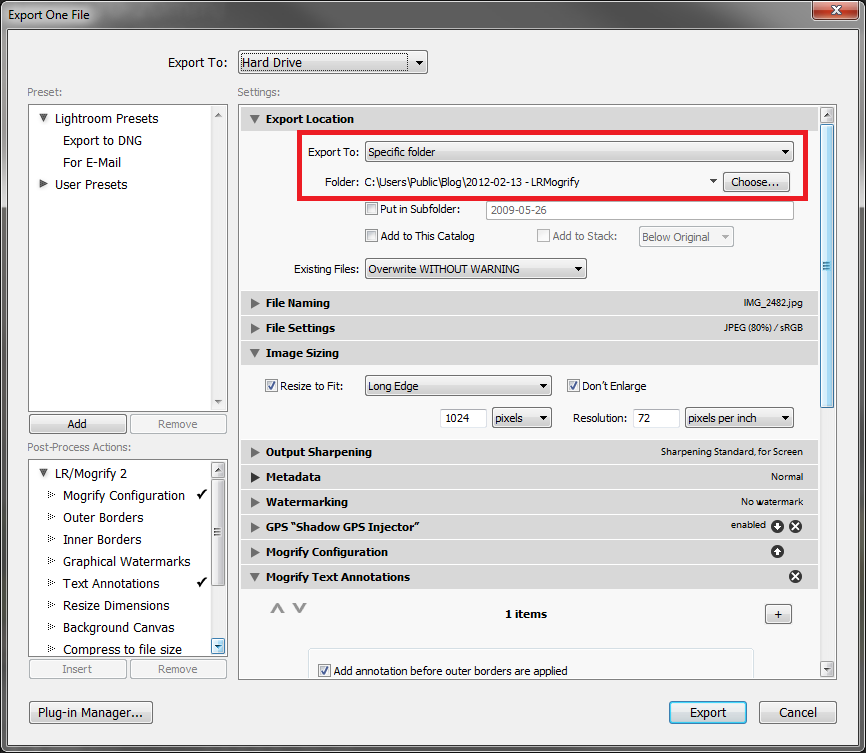
And, there we have it. We’ve setup a very simple watermark. Scroll up in the list and take note of the Export Location for your photos, that way we can find them after we hit Export. Go ahead and change the folder to something else if you don’t like where it is planning to save them 🙂
Once you have a folder set, go ahead and click the Export button at the bottom right of the dialog. It should export your photo and your text annotation should be stamped on your photo:
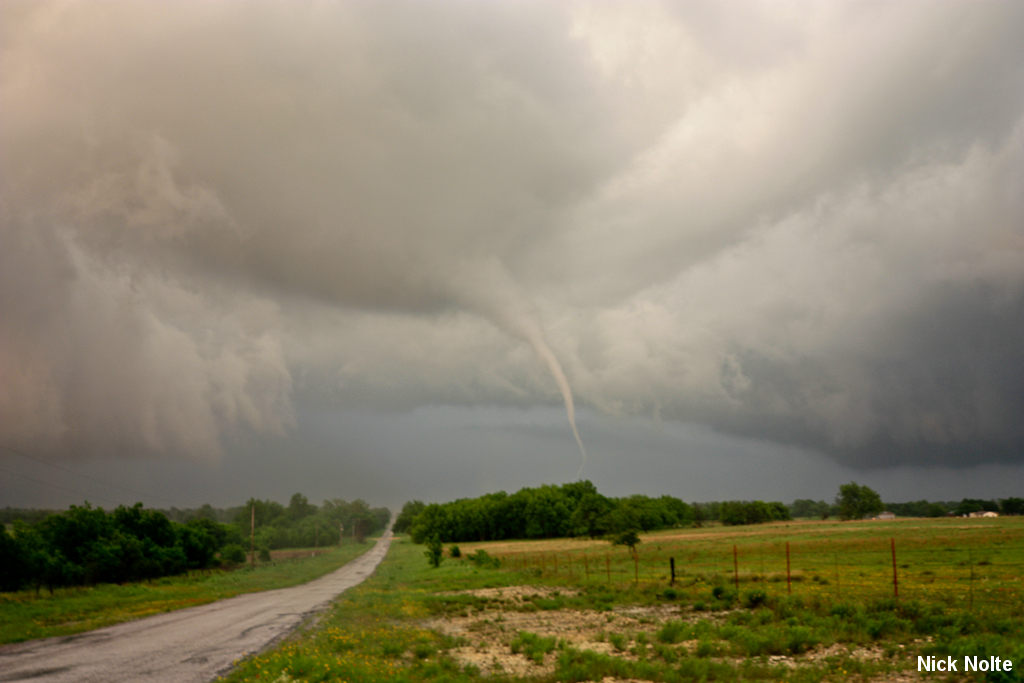
Woo. neato. We have a photo with our name on it. Well, that’s a good start, but we want to do a bit more. After all, we want to use that geotag information, don’t we? So, LR/Mogrify 2 has some powerful text annotation features. One of them being that you can place tokens in the box where we typed in our name. A token is basically a placeholder that the plugin reads and inserts different information for. So, if you right click on that photo again, and hit Export, then scroll down to the Mogrify Text Annotations box, you should see a button that says Add Token right under the box we typed our name.
You will see a box popup with three dropdowns that are packed full of tokens that you can use. For example, under the EXIF tokens drop-down, you can have it add a token for the Date and time of capture. That sounds like something we might be interested in. Go ahead and select that from the dropdown. It will add a token, {dateTimeOriginal}, to the text box. So, let’s make it so the date stamp is on one line, and your name is on the other line. Now, you can’t just press enter to put in a new line. Instead of pressing Enter, you type in the {return} token. So, make it look like so:

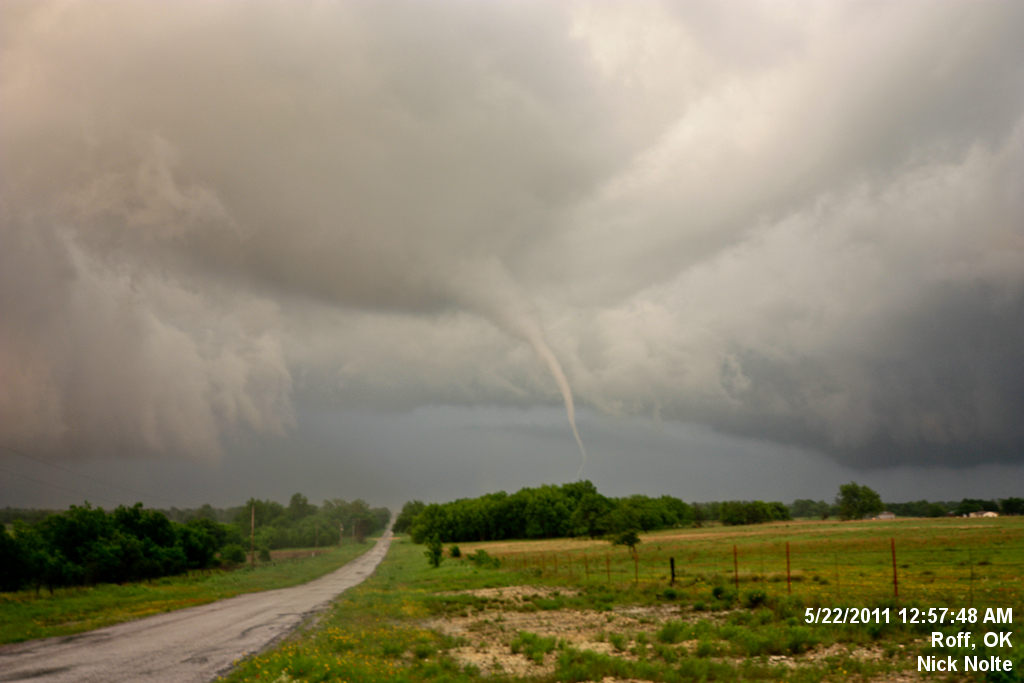
Then hit export, and you should see something similar to this:

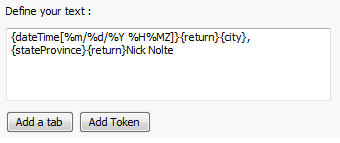
Sweet, we’re making progress. OK, now that we’ve learned about tokens, it’s time to get fancy with them. The tokens can also be used to retrieve other information about the photo and include it in the annotation. I use it to show where the photo was shot by pulling the data from the City and State metadata. Luckily, there are tokens for just such an occasion! Without further ado, right click on the photo — again — and click Export. Scroll back down to the Mogrify section, then click the Add token button. In the IPTC dropdown, select City. Click the Add token button again and select State/Province from the IPTC dropdown. Now move those tokens to right after the {return} token and place a comma and a space after {city} and before {stateProvince} then put another {return} and then your name. It should read like so: {dateTimeOriginal}{return}{city}, {stateProvince}{return}Nick Nolte:

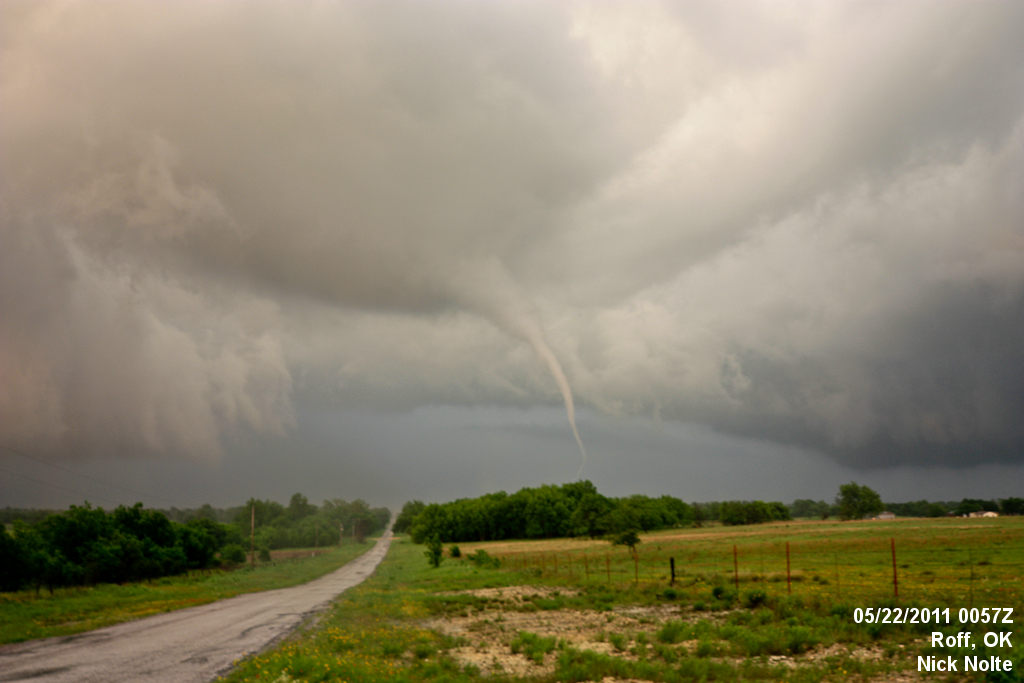
Now, hit export again and now your annotation will look like this:
Hey, we’re getting pretty good at this. You may be looking at the time stamp thinking that it’s a bit much for the photo. I agree, and luckily, the plugin provides us some way to modify how that date token looks. Let’s say we want it to look like this: 05/22/2011 1257Z (Z, since I’m shooting in UTC, or Zulu time. You might use CDT or EDT for whatever timezone your shots are in). We can format the date token to achieve just that like so: {dateTime[%m/%d/%Y %H%MZ]}. Whoa! Where’d that come from? The plugin has some date/time tokens you can use to just show certain parts of the date. Here they are:
- %B – Full name of month, e.g. ‘December’
- %b – 3 letter abbreviation, e.g. ‘Dec’
- %m – 2 digit month number, e.g. ’12’ or ’02’
- %d – Day number with leading zero, e.g. ’28’ or ’07’
- %e – Day number without leading zero, e.g. ’28’ or ‘7’
- %y – 2 digit year, e.g. ’12’ for 2012
- %Y – 4 digit year, e.g. ‘2012’
- %H – hour with leading zero (24-hour clock), e.g. ’01’ or ’22’
- %I – hour with leading zero (12-hour clock), e.g. ’01’ or ’10’
- %M – Minute with leading zero, e.g. ’01’ or ’59’
- %S – Second with leading zero, e.g. ’01’ or ’59’
- %p – AM/PM
- %% – the % symbol
So make it look like I described then hit export!
Cool stuff. Now, all that’s left to do is a little sprucing up. The LR/Mogrify plugin lets you specify three separate annotations. You can add another one by clicking that “+” just like you did to create the first one. What I like to do, is add a second one as a drop shadow to the first. So everything is exactly the same as the first one, except I change the font color to black and adjust the horizontal and vertical inset by a few pixels to offset it from the original. In the original (white text), the horizontal and vertical offsets are 10 pixels from the lower right edge. On the second annotation layer, I reduce these numbers to 7 so that the black text is just slightly below and to the right of the white text, as a traditional drop shadow would do. During this step, I’m also changing my font to Century Gothic Bold, just to make it looks a little more slick. Also, note that the annotations are applied in order, so #1 is placed first, then #2 and #3. So, for the drop shadow to look correct, your first annotation layer needs to be black, then #2 white so it gets laid on top.
One final thing I like to do is transform this into my copyright. So instead of it just saying “Nick Nolte” at the bottom, I’d like it to say “©2011 Nick Nolte” To accomplish this, we can use the date formatter token again, but just grab the year, that way it will always be copyrighted in the year the photo was shot. ©{dateTime[%Y]} Nick Nolte

Here is the final product of all our hard work

Going a step further…
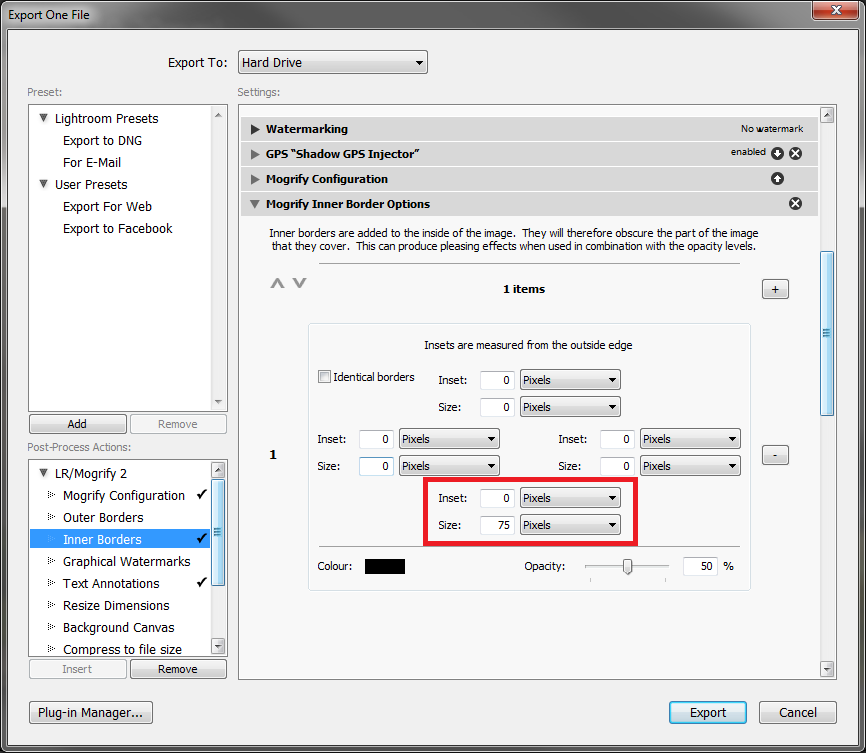
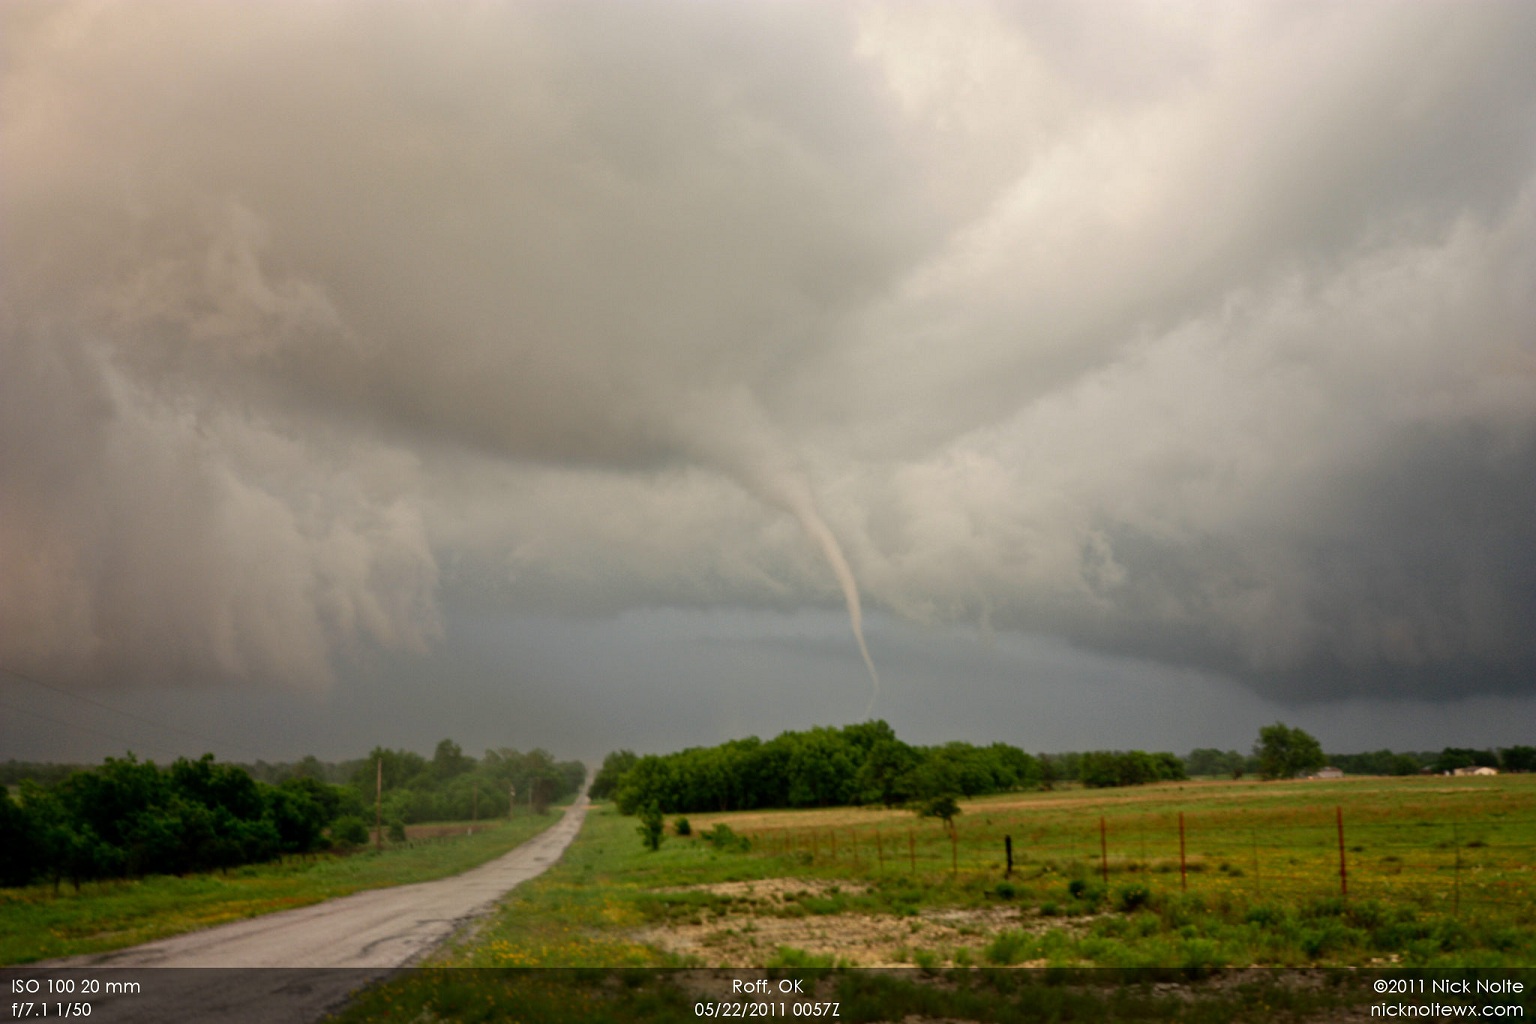
LR/Mogrify is a rather powerful plugin. I’m pretty sure I haven’t quite figured out everything it can do. Here’s one final setup, for a rather sleek looking stamp. Basically what I have done is switched on Inner Borders under the Post-Process Actions in the Export Dialog for LR/Mogrify. Then I expanded the Inner Border Options. In here I added one item, unchecked the Identical Borders checkbox then set the bottom one to 75 pixels. I then set the color to Black and the opacity to 50%. This will place a 75 pixel high semi transparent border at the bottom of the photo that I’ll then place Text Annotations on.
Now, I’ll venture back into the Text Annotations and setup 3 annotation items by clicking the “+” 3 times. The first item I’ll setup in the lower left position, the second in the lower center and the third in the lower right. Then for the lower left I decide I want to show the camera details for the photo, so I place in some EXIF tokens for {isoSpeedRating}, {focalLength}, {aperture} and {shutterSpeed}. In the center, I decide I want the date and location of the photo, so I toss {city}, {stateProvince}, {dateTime} tokens in there. In the lower right, I just have my standard copyright tag and my website. I made all the text white and made the horizontal insets 15 pixels on the left and right positions, and the vertical inset 5 pixels on all three.

Now, that this is all setup, export the image and see the result
Hopefully, you’ve enjoyed my series on GPS Logging and geotagging and the little glimpse I’ve given you into the power of Lightroom. If you have any questions or comments, feel free to post them below, or find me on Facebook or Twitter using the links at the top right of the home page! Have Fun!
Additional Resources
LR/Mogrify 2 Quick Guide – This has an overview of all the tools the LR/Mogrify 2 plugin has to offer including the same explanation of annotation tokens I dove into. It’s worth bookmarking!
@NickNolteWx – Follow me on Twitter!