Almost every storm chaser has a GPS device in their vehicle. Whether it be a personal nav device, a phone with GPS or a separate GPS puck they use with street atlas software. Being a data junkie, one of the things I like to do is log my GPS stream everytime I hook it up. This way, no matter what, I’ll always have a GPS log of wherever I went on any given day. Well, as long as I bring the laptop, anyway. Aside from having a historical record of my trip, keeping a GPS log enables you to do all kinds of cool stuff after the fact. I use my GPS data to create travel maps and compile chase statistics. I also use it to geotag the photos I take so I can always say exactly where I shot a particular photo. Not only that, but with some special software I can even create watermarks with the location and timestamp of the photo! This is part 1 of a series of blog entries that will show you what I do with my GPS data and how you can do it, too!
To start this blog off, I’ll show you what I do to collect GPS data everytime I boot up my laptop without having to remember to start logging. There are a couple of things that I use to do this, and if you have alternative methods, please post in the comments! The next couple of posts in this series will describe what to do with those logs after the chase!
- Globalsat BU-353 GPS Receiver – this is one of the best workhorse GPS pucks available. I’ve never had a single issue with it and it always picks up a strong signal. The damn thing just works. You can usually pick one of these up for about $30. You do not need to use this particular puck if you do not want to. As long as you get one that outputs a NMEA-0183 compatible data stream, you should be good to go.
- GpsGate Splitter – Normally when you plug in a GPS receiver to your laptop, it’s data stream is only available to one software program. GpsGate Splitter allows you to take the NMEA stream from your GPS device and send it to multiple programs simultaneously. Most chasers are familiar with this software as it allows them to send their GPS data to GR3, Streets & Trips, etc, all at the same time. GpsGate Splitter Standard runs $39.95 and is definitely worth the money. The Express version is free and it will support output to two devices, however it will not log. You need the standard edition to get the logging capabilities I refer to in this post.
First thing is first. If you have not downloaded GpsGate Splitter, do so at the link above. If you download the Express version it comes with a 14-day free trial of the Standard version for evaluation, so you can use that time to figure out if this is going to work for you. After you have installed GPSGate, plug your GPS receiver into one of your available USB ports and run GPSGate. The Globalsat BU-353 is plug and play so it should work right away. Other GPS pucks may have driver installation media that is necessary for you to install first.
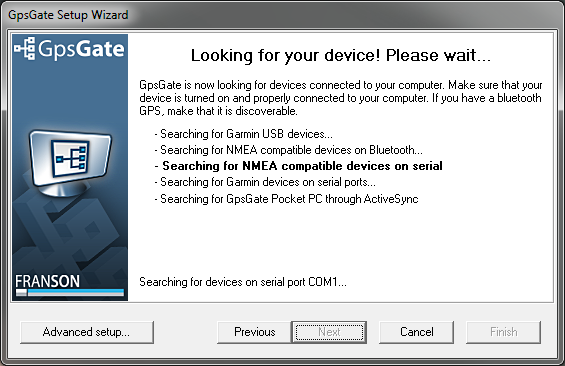
When you start GPSGate for the first time you are greeted with the GpsGate Setup Wizard:

You can keep all those clicked, or just check the ones that apply to you, either way it doesn’t hurt to let it search. In my case, I am using a NMEA compatible device, so if I desired, I could uncheck everything but the third box. Hit Next and GpsGate will start looking for devices plugged into your system.
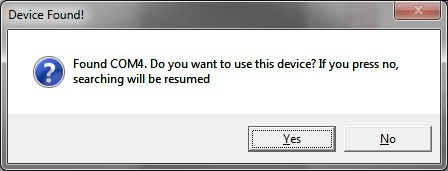
After it finds a compatible device, it will ask you if you want to use it. Click Yes and continue to the next step. If GpsGate was unable to locate your device, make sure it is plugged in and turned on. You can try the search again or check out the bottom of this entry on how to find what COM port your device is using.
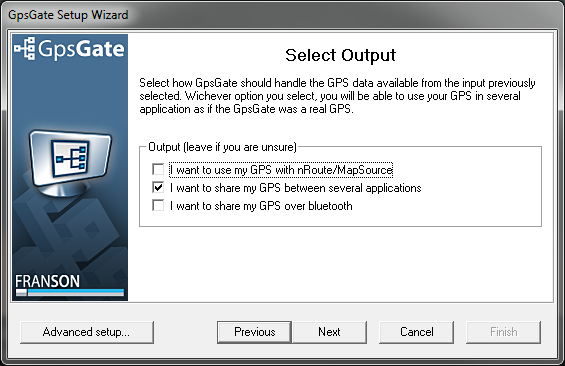
GpsGate will then ask you to select the outputs you want your GPS stream to be passed on to. I am only selecting the second choice as I do not use nRoute or MapSource, but if you do, you may wish to leave that checked.
GpsGate will then show you a summary of the settings it has enabled. If you only checked the second box above it should create 4 virtual COM ports which you can now use with other software as if they were separate GPS devices.

At this point, your basic setup is finished. If you click Finish, the wizard will disappear and you will see a little icon in your task tray (over by your clock) showing that GpsGate is running in the background. If the icon is green, that means GPS data is coming in from your device successfully. If it is yellow, that means a GPS stream is coming in but there is not a valid GPS fix yet, this can happen if you just plugged your device in or if you pass through a tunnel. If it is red, it means no GPS data is coming in from your device, meaning it is either not plugged in, not turned on, not a compatible device or GpsGate is configured for the wrong port.
Instead of clicking Finish, though, we’re going to click the Advanced button and get down to the nitty gritty. If you already clicked finish 🙂 , you can right click the GpsGate icon in your task tray and select Settings. That will bring up the main GpsGate application. If it looks like this and the icon is green, congratulations, GpsGate is working perfectly so far.
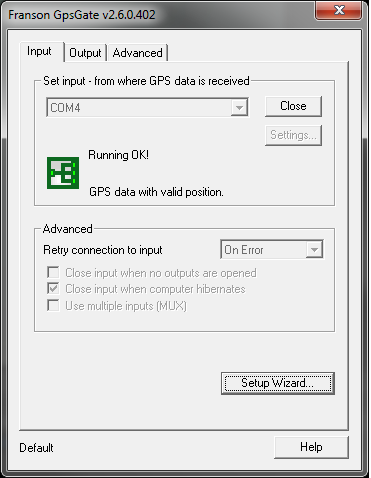
The first thing we want to do is click on the Output tab at the top of the window. This shows you where GpsGate is sending your data. You should see GpsGate Direct and the four COM ports it created earlier.
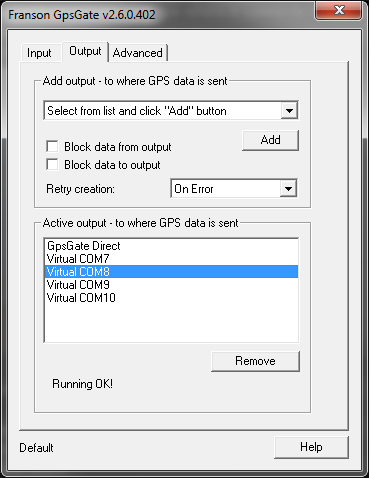
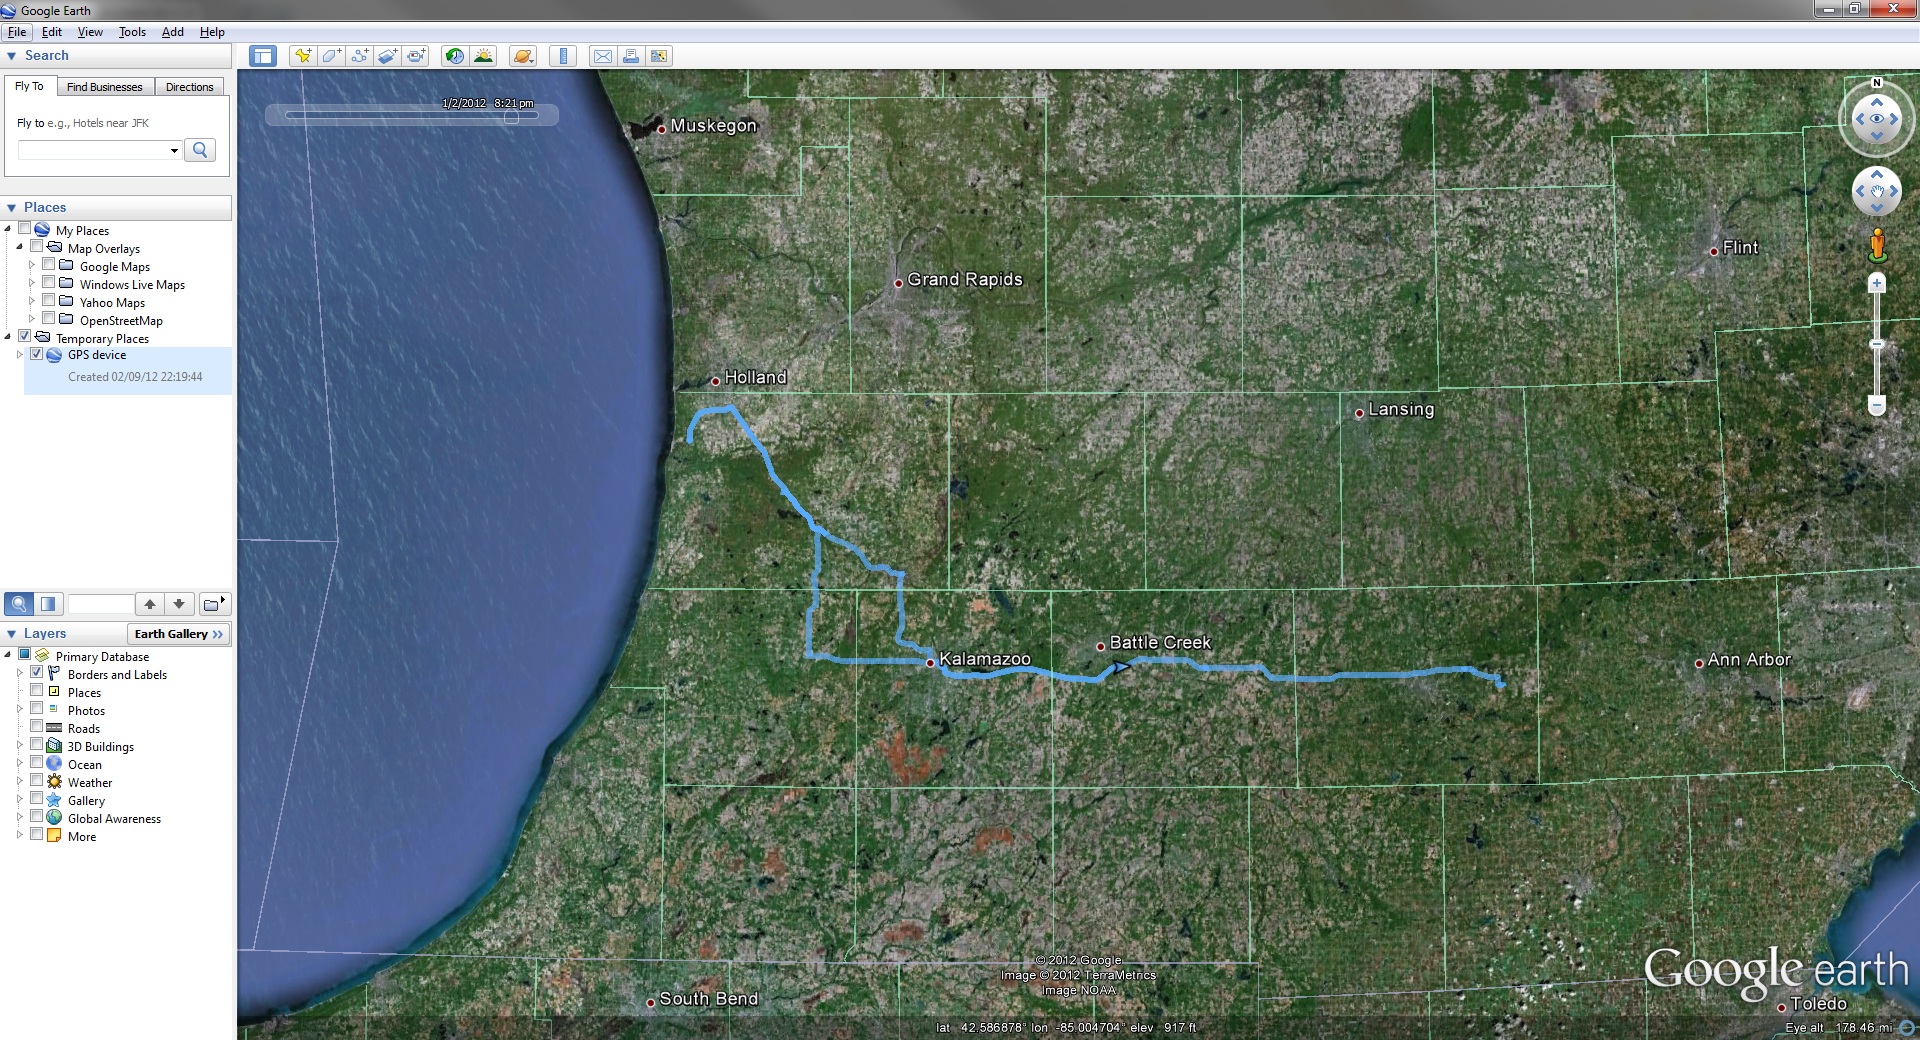
In my screenshot you’ll see it created Virtual COM ports 7 through 10. Your numbers will probably be different as the available COM ports are different with each computer. If you click on one of the Virtual COM ports, below you should see “Running OK!” That means GpsGate is sending data to that port. If we wanted to see, for real, that it was working, we can boot up any mapping system (Streets and Trips, DeLorme, etc.). I’m going to open up Google Earth and turn on the Real-Time GPS:
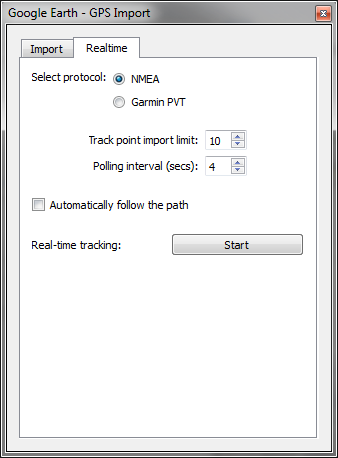
You should see a little blue dot with the label “Position” on it. If you do, good, that means it’s working!

OK, now that we’ve made sure everything is good, we can setup logging. You may notice that all the outputs are COM ports, but how do we log the data to a file? Simple enough. In the top of the Output tab there is an “Add output” drop down selection box. In there, you’ll find all sorts of goodies. Just a quick glance down the list and you can send GPS data to a web server (TCP/IP Server), Google Earth directly, Bluetooth and you can even add more Virtual COM Ports! The one we are really interested in is the File Recorder / NMEA Filter selection.
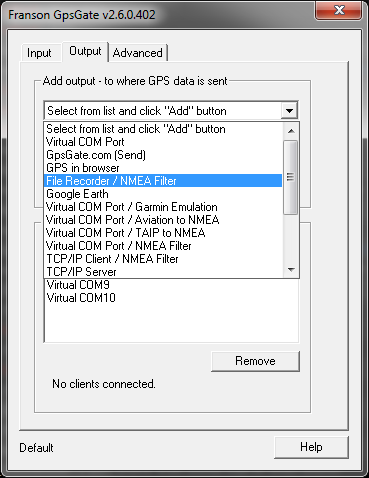
Select that, then hit the Add button. This pops up a new screen asking where you want the logs to be stored, so Browse to a location where you want to save your logs (don’t forget!). The dropdown labeled Create a new file every makes GpsGate create a new log file every 15 minutes, every hour or every 24 hours. You can also leave it as Save to same file. This is the choice I use. What it does is creates a new log everytime the computer boots and keeps storing data in that same log until the computer is shut down, or GpsGate is terminated.
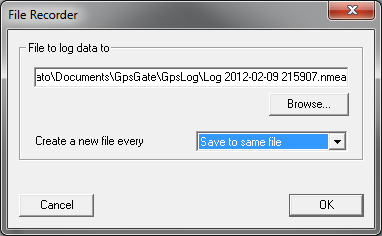
Once you’ve setup where, and how often, you want to save the logs, click OK and the NMEA Filter box comes up. I typically leave the defaults and tell it to log all the NMEA data, but you can only log certain NMEA sentences, or block certain ones if you don’t need the data. NMEA logs for an entire day are only about 10 MB, so I don’t see it as a big deal to just log everything, but it’s up to you.
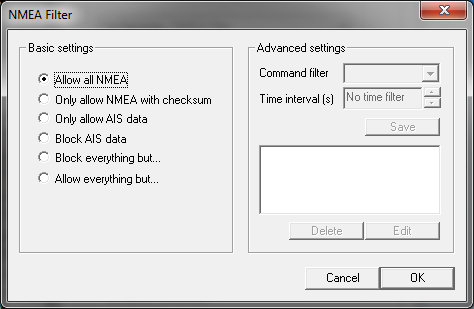
For example, if all you wanted was the actual GPS positional data you can select the radio button next to Block everything but… then in the Command filter drop down, select $GPRMC and save it to the filter list. $GPRMC sentence in the NMEA stream contains data on your current position including:
- Time of the fix
- Latitude and Longitude
- Ground speed in knots
- Current heading relative to true north
- Current date
- Magnetic variation
There are many NMEA GPS sentences, and others provide other information such as how many satellites are in view, bearing and distance to a given waypoint, etc. You can check out more information on the various NMEA sentences by checking out THIS SITE by Glenn Baddeley which breaks down the NMEA format in detail!
Once you’ve decided on your settings for the NMEA filter, click OK and the NMEA recorder will begin logging all the GPS data to the location you specified. To verify that it is setup correctly, click on the new entry in the Output tab that is labeled as Recorder… below your list of Virtual COM Ports. It should say Running OK! at the bottom, and just like that, you’ve got your GPS data being logged to a file.

By default, GpsGate logs to a folder within your Documents folder. On Windows 7 this is usually located at C:Users<your user>My DocumentsGpsGateGpsLog (unless you set it to save somewhere else). Inside this folder you should see files named like “Log 2012-02-09 221217.nmea” which is basically a timestamp when the log was created.

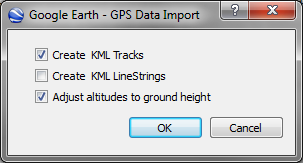
You can open this file in a text editor and check out what kind of information is in there, if you’re curious. It is basically a stream of NMEA sentences, one per line. The type of data contained within each line is determined by the identifier at the beginning of the sentence. As I mentioned before, lines that begin with $GPRMC are your positional data that we can use for all the cool stuff later. If you’re itching to do some cool stuff now, you can actually open a .nmea file within Google Earth. Just go to File -> Open, browse to the folder where your logs are stored and in the lower right corner of the File dialog it’ll say it’s looking for Google Earth files, like *.kml and *.kmz. If you pull that list down and select Gps, your NMEA files should show up. When you double click on one, a box will popup asking you to define your settings for the import. I usually leave Create KML Tracks and Adjust Altitude to Ground Height checked. This will draw a line of your log on top of the terrain in Google Earth and allow you to animate the route as well as drag the time slider and move your “car” back and forth through time.

One more thing you should do to make sure GpsGate always runs when you’re computer starts, is add it to your Startup folder. You can do this by navigating to Start -> Franson GpsGate and right click the Franson GpsGate program icon (not the service) and select Copy. Then navigate to Start -> Startup and paste it in there. That way it will be sure to boot up and start logging everytime you switch on your laptop, in case you forget 🙂
Hopefully, you’ve enjoyed this introduction to GPS logging and I invite you to stay tuned for the next entry where I’ll talk about converting NMEA logs to other formats (gps, kml, etc) as well as how to make sure your camera is setup correctly to facilitate the automatic geotagging of your photos!
Cheers!
So, what port is my GPS device using?

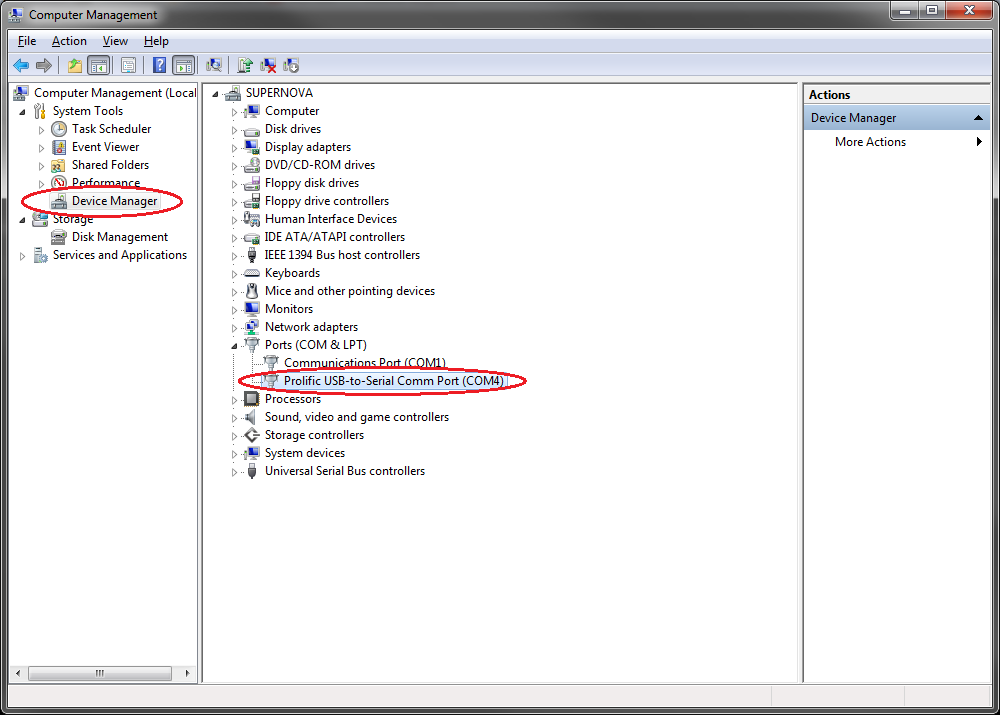


So, you’ve plugged in your GPS device, but you have no idea what port it is on, or even how to get data out of it. Most GPS devices are USB, but when plugged in, emulate a serial port. Serial ports show up on your computer as COM ports. To find out what port your device is registered on you need to venture into the Device Manager. The easiest way to do this on Windows 7 is to click Start then right click on Computerand select Manage.
This will bring up the Computer Management console. In here, on the left side under System Tools you should see an item called Device Manager. That’s what we want, so click on it. It will list all the logical devices on your computer including monitors, disk drives, keyboards and Ports. Since we’re trying to find what port our device is on, expand the category called Ports (COM & LPT). Beneath that you will see a listing of all the COM ports in use on your computer. The BU-353 GPS device uses the Prolific USB-to-Serial driver and it shows that it is on COM4.
To use this information to get GpsGate running, go back to the GpsGate application and make sure you’re on the Input tab. In the drop-down if it does not say the port your GPS device is on (in my case COM4), expand the drop down and select “COM Port”. Click the Open button then in the new window select your appropriate COM port from the Serial port drop-down, in my case I select COM4. The rest of the settings should be:
- Baud rate: 4800
- Parity: No
- Stop bits: One
- Byte size: 8
- Handshake: None
- DTR: checked
- RTS: unchecked
Click OK and your GPS icon should switch to green (or yellow if it’s still acquiring a satellite fix) and it should say “Running OK!”